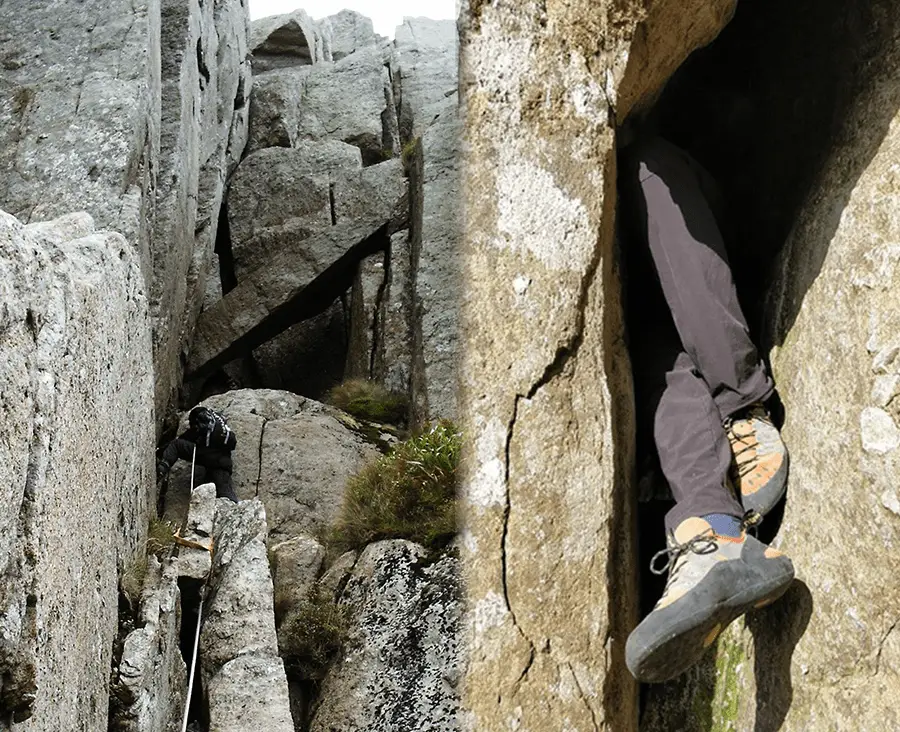
A fun route youngsters will love and those with a beer belly will curse.
The route can be reached either from Llyn Ogwen via the Llyn Bochlwyd path, or over Bwlch Tryfan.
This is a long undertaking, and a difficult scramble (Grade 3***).
The vast majority of parties will want to take a rope on this scramble.
It’s advised that you wear proper scrambling footwear.
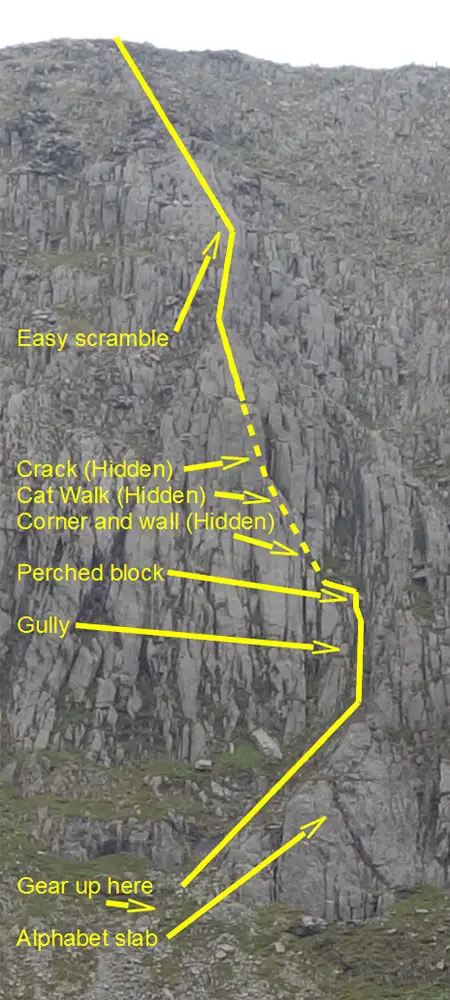
Route Map
Approach
From Llyn Bochlwyd locate the line of scree that drops from the centre of the crag foot at the top of which is Alphabet Slab; an obvious triangular slab split by two cracks.
Skirt the lake on the left or take the Tryfan path and traverse in later to avoid any bog.
From Bwlch Tryfan descent about 20m of height (70m in distance) to the bottom of the crags and break left (WSW) away from the path across grass. Alphabet Slab has a grass slope and big parrallel chimney behind it. See photo
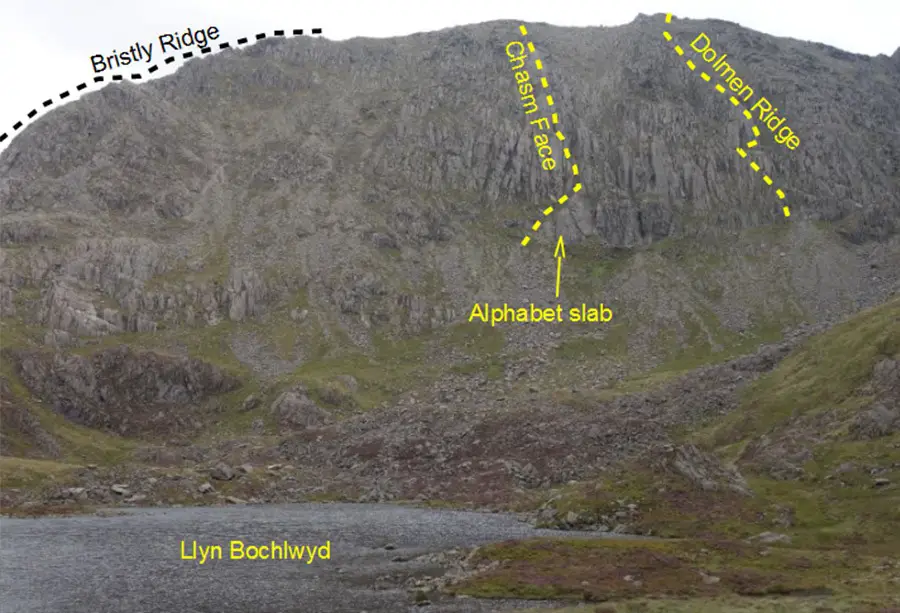
Alphabet Slabs
Reach Alphabet Slab and gear up at the top of the scree. Climb the grass diagonally rightwards (westwards) above alphabet slab turning left into the gulley that slices the main cliff, not the chimney directly ahead.
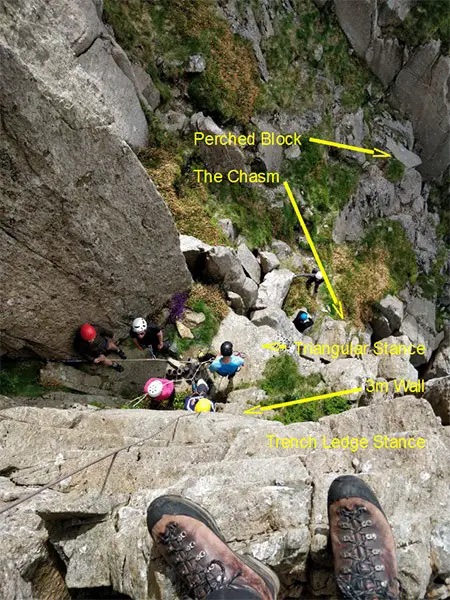
The Chasm
Follow this to the perched block that halts your progress.
Don’t try to belly shuffle the block directly! Be firm with your companions as they will try it.
Instead climb to the block then rotate left to face the left wall of the gully; a few easy steps lead out of the gully to an easy but exposed sloping scramble up to grass. Rope recommended here.
Walk leftwards across grass to the left wall of the gully where there’s a choice of routes across a crack (the chasm) up to a triangular corner stance.
An impossible looking wall faces you.
All but the most competent climbers should rope up for this bit.
Climb the wall diagonally leftwards gaining a ledge belay at about 3m. Notable for its trench like character.
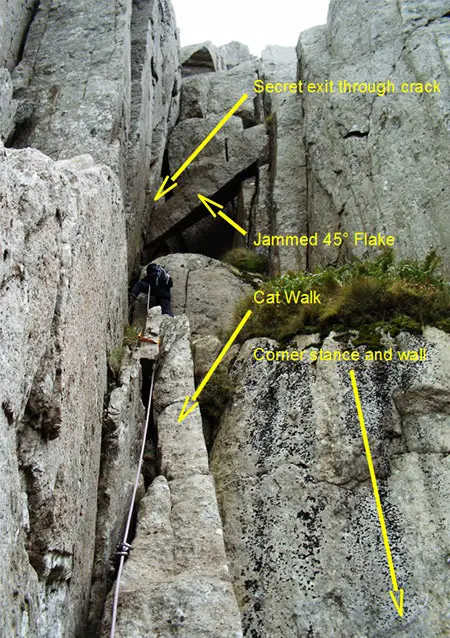
The Cat Walk
Climb the “cat walk” ramp to the awkward rounded bulge (not much gear so not a good belay point) and grunt up and under the jammed 45° flake.
Go under the flake and left. Belay here at its base.
Kids and group members can be stacked at the base of the flake. You can exit via the flake, which has a VD sting in its tail. The crack is easier.
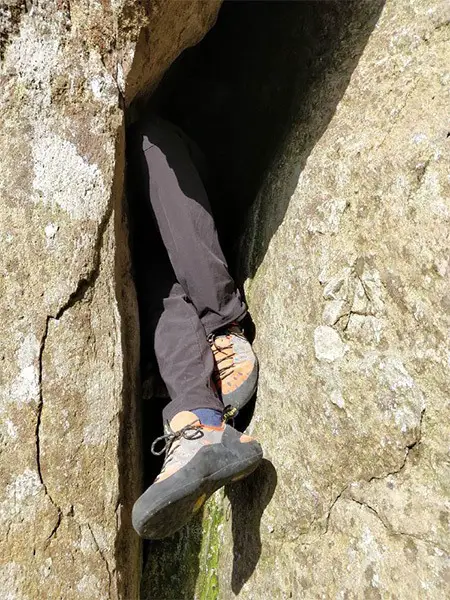
The “dreaded” Crack
Locate the crack at the base of the flake. Adults need to lie on their right side facing the left face and grunt, wiggle, curse the beer etc. Initially there is only darkness so be confident! Climb to the light.
Sacks can be dropped off before the crack and hauled from above later if there is a free rope; though its quicker, if a bit more awkward, to push the sack ahead of you.
The final top moves out of the cave section can be tricky and a rope may be useful here.
The Finish
Improvise the ridge to the top, with occasional difficulty.
Continue straight ahead at the top for the obligatory Cantilever Rock photo.
Belay Relay for Groups
With a group of more than 5 you need to consider a relay belay to hasten the ascent from the triangular stance to the top of the cave section.
Even with this in place expect a 12 hour day and start early.
You will need two scramble ropes circa 20m and a 50m climbing rope. One leader and two competent belayers head up from the triangular stance.
Stance 1 is at the top of the 3m wall above the triangular stance standing in the trench ledge. From here you can belay up from the triangular stance or even from the grass over the chasm.
One end of the 50m rope is tied off here (possibly to the belayer) so that it can be pulled down after each group member passes.
Stance 2 is under the flake against the back wall. Don’t be tempted to belay before the awkward bulge just before the 45° flake. There’s not much gear and as a stance for a group its a bit poor.
The 50m rope now runs from stance1 to stance2 with plenty of slack at stance 1 so that climbers are attached to a Fig8 in the middle.
Stance 3 is through the crack and at the top of the vertical cave. There is a good location for piling group members about 2m above over a bulge.
The process is as follows;
Group member 1 climbs to stance 1
-> they are tied with a Fig 8 to the middle of the 50m rope and ascend the cat walk to stance 2 clipping “through” the gear
-> at stance 2 they are disconnected from the rope and the fig 8 knot untied. The belayer on stance 1 pulls half the 50m rope down ready for group member 2
-> member 1 wriggles the crack and clips into the rope for the vertical cave climb to stance 3
-> staying roped up they pass the belayer going over the bulge to the safer stance area and un clip
-> if there is a spare rope then they can start the sack hauling if necessary, thus its handy if your first group member is trustworthy and competent.
Group member 2 starts as soon as member 1 is ascending the cat walk. The aim is to keep all three ropes in action the whole time.
In this way a group can be “processed” fairly quickly up the difficult pitches.
Descent
An easy descent can be made via The Gribin Ridge.
Recommended Guidebook & Map
The best guidebook for this route is the excellent Scrambles in Snowdonia Cicerone book by Steve Ashton, available on Amazon in paperback or ebook here.
The best map for this scrambling route is the OL17 Ordnance Survey Map – Snowdon / YR WYDDFA, which is available on Amazon here.
Recommended Scrambling Guide: (coming soon)
Recommended Accommodation:
You can find accommodation for any budget in the area on Booking.com here.
Route Info
| Distance | 5.54 km |
| Elevation | 732m +/- |
| Duration | 8 - 10 hours |
| Grade | 3*** |
| Transport | Car, Tryfan Car Park |
Navigation
| Guidebook | Best Book |
| Maps | Best Map |
| Guided Tours | Guides |
| Accommodation | Where To Stay? |
| Contributor | Who Contributed? |
Route Contributed by Steve, from Outdoor Duo
“A dating and friendship site for singles who love the outdoors.”
(The first image is (c) Howie collection.)
Learn more about it on their website here: https://outdoorduo.co.uk/
This route was created by Steve and donated to the UK Scrambles website through our contributor program.
This generosity enables us to publish a whole range of scrambling routes to help you enjoy the outdoors.
If you have a route you could contribute, submit it to us today.


This Post Has 0 Comments